 Highlighting the creative magic behind post-processed photos
After a fun and successful May One Photo Focus, we’re back to ABFriday this week. Just a reminder, because May has 5 Fridays, the photo for June’s One Photo Focus won’t be revealed until May 22 (Week 50). BUT that image will actually be one of mine and will be processed by participants on the six-month anniversary 1PF post/one-year anniversary ABFriday post on June 5, so be sure to check back if you want to participate! For all the details on ABFriday and One Photo Focus, visit the After-Before Friday Forum page.
And now, on to this week’s galleries of submissions!
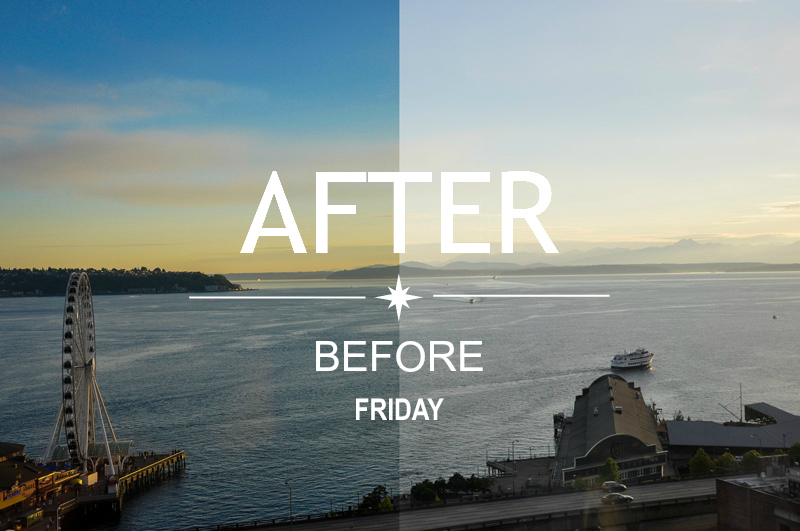
My submission: To continue testing out my rented Fuji 100XT, I embarked on a sunrise shoot in Washington, D.C., where I took this shot from the Lincoln Memorial looking over the Reflecting Pool to the Washington Monument. Mounted on a tripod, I set the camera with its fixed 23mm 2.0 lens to 2 sec @f/5.6, ISO 200, and bracketed three 1-stop shots (1 second, 2 seconds, and 4 seconds). I combined these shots using the new LR6/CC “merge to HDR” setting, made a few edits, exported it to Nik Color Efex Pro for a few more tweaks, and back in LR used the spot removal brush and decreased the vibrance just a bit. And, as “they” say, voila! Yeah, I know it sounds like a lot, but it really isn’t. (P.S. Forgive the ringing iPhone near the end of the video – forgot to silence it! Shout out to my daughter who held on as I finished up the last minute 😀)
Note: I have been having problems using LR6 in conjunction with .tiff files created in outside programs (like my beloved Nik suite). I am not alone in this. If any of you have been experiencing the same, let me know. I’ve done a fair bit of research and have found a current workaround (though not satisfactory for the long term). Fingers crossed Adobe figures this out sooner rather than later!
 Washington Monument, Dawn")


Submitted by Katie Prior — Drawing with Light
 Katie Prior, Drawing with Light")

Katie says: This week, I am revisiting an image that I worked on a few weeks ago. Having recently acquired Photoshop, I have been able to edit it further to remove an unwanted element in the photo. As a newbie Photoshop user, I thought this would be something nice and simple to start with.
Submitted by Klara — Sliku svoju ljubim II
 Klara, Sliku svoju ljubim II")

Klara says: This was taken at the flower exhibition near Brussels. I wanted to discard this photo, but than thought of trying to save/improve it. I am happy with the result. Details of the process are here.
Submitted by Lynne Ayers — Beyond the Brush Photography
 Lynne Ayers, Beyond the Brush Photography")

Lynne says: After a major crop I used the median filter on the background to soften and blur it.
Submitted by Benjamin Rowe — Aperture64
 Benjamin Rowe, Aperture64")

Ben says: After last week was a lot of fun, now I am back to the usual workflow. My post will be live here.
Submitted by Nancy Merrill – nancy merrill photography
 Nancy Merrill, nancy merrill photography")

Please click on the links of those who contributed this week, to read about their post-processing steps and/or to see what other treasures they have on their blogs. They’d love to have you visit!
So what do you think of the ABFriday forum?
Feel free to leave your thoughts and suggestions in the comment section. And don’t forget to view the guidelines if you want to participate. I’d love to have you onboard!

I just watched your video and was blown away. There is so much to learn. I can also see why you would really get into this processing. I love your enthusiasm for this project, Stacy. It’s fun following along.
LikeLike
Wow, Alys! Watching one of my videos is certainly being a trooper 🙂 I really didn’t know post-processing existed when I first started getting “serious” about photography and posting pictures, but once I found out about it and started dabbling in it, it opened up a whole new photographic world (and many learning curves!). It actually continues to teach me to take better pictures as well, as it’s much better to get the basics right in camera than trying to fix them in post all the time! And as you can see from these posts (especially One Photo Focus), post-processing is as much a creative part of photography as is taking the picture. So glad you’re enjoying following along. Thanks so much for that!
LikeLike
Very nice final result. The HDR function in LR looks less complicated than the Photoshop version, which I’ve tried a couple times but have never produced an image worth keeping. PhotoMatix and I don’t get along either, but it’s probably me. Looks like you had some really interesting clouds that morning. I really like the image. It appears that they have finally filled in the Reflecting Pool. I haven’t there in a couple weeks and it was still dry at the time.
LikeLike
Robin, the clouds were amazing! I so lucked out. Even a few of the joggers who run the route every day and see the sunrises stopped to photograph it with their phones, saying it didn’t get much better than that! I did take a look at the PS HDR merge function but was a bit overwhelmed (why should that not surprise me? 😉). I’m going to look at Photomatix just to see what that’s all about, but if LR figures out their bugs, no use paying for something that gives me a decent HDR image from which to work.
LikeLike
Great result Stacy. I love the beautiful tones. So helpful to see the video too. Thanks for showing us HDR doesn’t have to be harsh!
LikeLike
Oh, thanks so much for that, Chris! After having fun getting used to the HDR function, my goal now is, in fact, to make more “realistic-looking” HDR images. I wasn’t consciously going after that goal here – I was going my usual post-processing route and making an image that looked good to my eye. Glad to hear that you found the result so pleasing 🙂
LikeLiked by 1 person
Very nice editing.
LikeLike
Thanks, Raewyn 🙂
LikeLike
That one of the little girl is amazing, but great job everyone! 🙂
LikeLike
I know, isn’t it, Sheena??? Thanks so much for chiming in 🙂
LikeLike
Great editing process, Stacy! I hope to do HDR merge in the near future. 🙂
I will be taking a break next week, so will see you the week after. Thank you again!
LikeLike
Thanks, Amy! Hope you’re enjoying your break. As for HDR, I’m enjoying learning the ins and outs 🙂
LikeLike
What a gorgeous picture Stacy! The HDR has worked really well on this, and its such a great image to start with, lovely composition, beautiful tones and colours. Love it! 🙂
LikeLike
Thanks so much, Katie! I’m really having fun exploring the use of HDR, which seems to be a wonderful tool for sunrise/sunset photos. It certainly makes my post-processing much simpler. I want to make sure, though, that I find the right “HDR” balance – not overuse it or overprocess it.
LikeLiked by 1 person
Some really great edits here. The Washington Monument is a perfect subject. 🙂
LikeLike
Thanks, Sylvia. So glad you liked what you saw 🙂
LikeLiked by 1 person
Really beautiful! I noticed that the new LR can do HDR and tested it out. I think it’s ok and certainly your images proved that it is more than that, but the Nik HDR or Photomatix do a much better job of it. Plus you can access them directly from LR at the bottom from the film strip. You just highlight the three, five or however many bracketed raw images, right click and you can open them right into Nik HDR that way without even getting into Photoshop. It then creates a tiff in lightroom after you’ve worked on it.
LikeLike
Thanks for the information, Laura! Funny, I just got an article in my inbox about how to best use HDR in Photomatix – I’ll definitely be giving it a try. I do have the Nik software, but haven’t figured out the interface yet 😉
LikeLiked by 1 person
You’er welcome Stacy! If you ever want, I could share my skype screen with you and show you. I like to help. 🙂
LikeLike
You’re the best, Laura! I’ll let you know once I’ve had a chance to delve into it, but an opportunity to learn from a master is awesome 😀
LikeLiked by 1 person
Sounds like a plan. I’m cackling about the master. Oh yes little grasshopper! 😊👌
LikeLike
LOL 😀
LikeLiked by 1 person
Just ask me whenever you want. Don’t be shy!
LikeLiked by 1 person
Nice editing. I haven’t used the HDR merge…..yet.
LikeLike
Thanks, Mary. I don’t know how it compares to Photoshop as I never used that (I never really bracketed before), but now with me playing around with the Fuji and going out at sunrise and sunset, I’m finding a need for bracketing and having HDR merge as a native LR app is certainly convenient!
LikeLike